
Starting a Shipwreck Recording Project
![]() Download a PDF version of this document
Download a PDF version of this document
_s.JPG)
Summary
This was written to help you get started with your shipwreck recording project. The example used is for a ship but the similar methods can be used for aircraft and other archaeological sites. A step by step description is followed by notes on where to get advice and training, your responsibilities and equipment we commonly use.
This can be done in a series of steps:
- Record the position of the site
- Make a sketch of the site
- Make a site plan
- Do some research
- Publish the results
Typical aims of a project are to create a site plan, to investigate the history of the ship and to publish what you have learned.
Step by Step
Record the Position
The first step is to record the position of the site so you can find it again or put its position on a chart. Getting a position is easy these days as most boats have a GPS receiver which can show position as a latitude and longitude. The easiest way to get a good position is to put a diver in the middle of the site carrying a marker buoy then record the latitude and longitude of the buoy using the GPS. Do this at slack water on a calm day and make sure that the buoy line is pulled tight so the buoy is directly above the site.
Find out which way the wreck lies on the seabed as this may give clues about where more of it can be found. The orientation of the site can be worked out if you record the positions of the furthest ends of the site by taking GPS fixes on a diver with a marker buoy.
It is also useful to know which are the shallowest and deepest parts of the site. For sites at sea the depth of water over the site varies with the tide, so its useful to record the time the depths were measured so the tide height can be worked out and taken away from the measured depths. Photographs taken on the boat of the general location of the site are always handy too.
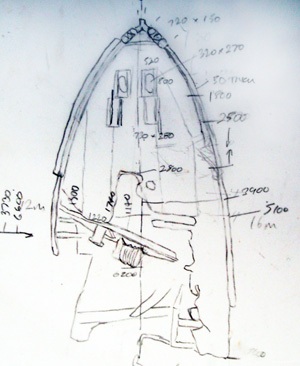
Make a Sketch
Once you know where the site is, its depth and which way it lies you can explore the site further and find out more about it. If the site has not been found before then you may have only located part of the wreck, so send teams of divers off on different compass bearings to search for other parts of the site. Get the divers to use a line reel marked up in 5 or 10 metre intervals, attached to a point on the site, then they will know how far they are from the start when anything is found. By measuring the bearing along the line with a diver’s magnetic compass the position of the new find can be worked out.
The aim of this part of the project is to put together a site plan, and for this its usually easiest to start with a quick sketch of the site. The aim of the sketch is not to create an artistic representation of the site but a simple sketch which shows the main features and where they are in relation to each other. We need something like directions to a pub on the back of an envelope rather than a watercolour painting. Draw the site from above rather than as a 3D representation as it’s this sketch that gets used as the starting point for the site plan. The sketch should be done fairly quickly without getting bogged down in details, it should only take a couple of dives to get an idea of the main features on the site.
Make lots of notes while you are underwater on a plastic slate, this is best done while still underwater as you will not remember everything once you are back on the boat.
Information you should record includes:
- Estimated length and width of the site
- Seabed types - rock, boulders, gravel, sand, mud
- Seabed shape - Flat, sloping, shallow gullies, deep gullies
- Wreck integrity - Largely intact, broken into sections, buried, collapsed and jumbled, scattered
- Structure - keel, stem, stern, ribs (frames), plating or planking, deck,
- Hull construction - iron, iron frames with wood, mostly wood with some iron fittings, all wood
- Gear - anchors, boilers, engine, chain, windlass, propeller, rudder, ballast
- Other features - cannons, cargo, small objects, note any makers names or marks
Take lots of photos and video and if possible put a scale in the photographs to give you an idea how big things are; a scale bar or folding rule is best but a diving knife can be used as well.
On scattered sites it can be useful to tag and label each object as its found. This is so each member of the team uses the same name for each object when discussing what they saw and so its easy to spot newly discovered items as they are the ones without tags.
We also need to record some basic information about the wreck site. This will help you to work out what the wreck is and how old it could be but will also be useful when you make the plan.
For newly found site try to resist the temptation to remove all the interesting finds straight away. You will lose useful information which may help you identify the site but you will also end up with a load of finds that need expensive conservation, see the note on Finds later on.
Make a Site Plan
Make notes...
... make lots of notes
The next step is to turn the sketch into a site plan by doing what is called an ‘assessment survey’. The aim is to make a map of the site that shows the main features at the correct size, drawn in the right place and gives an idea of what they look like when viewed from above. To do this we need to bring in some simple survey techniques using tape measures.
For smaller sites we can lay a tape measure ‘baseline’ down through the middle of the site and use that as our reference for the survey work. For sites that have an obstruction across the middle the tape can be laid alongside the site rather than right through it. The sketch made earlier should help when planning where to put the tape baseline and how long the baseline needs to be. Measurements made from points used to mark each feature to the tape baseline can then be drawn to scale on a piece of paper or on a computer and used to make the site plan.
The tape measure should be attached to a survey point at each end so it stays in place. The survey point is usually a metal rod pushed into a sandy seabed or a pin hammered into a crevice on a rocky reef, something strong enough to attach a tape measure to. The survey point should be permanently fixed to the seabed, easily found again and clearly marked with a label showing its unique number. The depth of each survey point should be measured with a dive computer and corrected for the effects of tide.
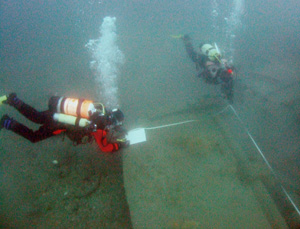
With the tape measure baseline firmly secured between the two survey points it can be used for the survey tasks. Any point on the site can be positioned relative to the baseline by making a measurement from the point to the baseline using a second tape measure, the second tape should meet the baseline at a right angle. This is known as an offset measurement. Two distances should be written down, the distance from the zero end of the baseline to the second tape and the distance from the baseline to the ‘detail’ point to be positioned. The depth of each detail point should be measured with a dive computer and also corrected for tide.
The site plan can be drawn to scale on paper using a scale rule and a set square to define the right angle for each offset measurement. The site plan should initially show the survey points used to position the baseline, the baseline itself and the detail points that were positioned from it.
For large or scattered sites it may be easier to record the position of each separate part of the site using a GPS and buoy as described above. Each part can then be recorded in detail using its own separate baseline. In this case the survey points at the ends of each baseline should be positioned using the GPS so the separate parts can be placed together on a single plan.
Deciding what to position with tape measurements can be tricky. Where time on site is limited it is better to get an overall rough site plan completed than do just a small area in great detail. Once the whole site has been recorded coarsely and added to the site plan you can always go back and add more detail to the plan on later dives.
The points on the site itself that have been positioned should be marked so they can be found again and have labels attached so you can tell which point is which. Bright yellow flagging tape or yellow plastic cable ties can be tied around objects and structure and used as markers. Labels should be made of plastic so they survive for some time underwater, Disk-Mark labels are best for this but you can also use white garden tags or even plastic strips made from empty margarine tubs. Tags should not be attached to fragile objects as they may break or get washed away, instead attach a tag to a stone and put it next to the object.
Record large sites in separate pieces...
With each object positioned the features can then be recorded in detail. The site plan is still just a lot of dots showing where each feature is so now we need to draw in each feature as it would be seen from above. Details can be recorded from sketches of small areas backed up with measurements made with a tape measure or folding rule. In some cases its easier to take a photograph of the object from above and use that to help add detail to the plan, but don’t forget to add a scale to the photograph so the object gets drawn the right size.
With the main features shown on the plan we can now add more detail, such as the location of small finds, the different types of seabed found on the site or contours to represent the changes in depth across the site. The site plan can be considered complete once all of the main features have been recorded to the same level of detail. Make sure the plan drawing includes the name of the site, a scale bar to show the size, an arrow to indicate north, the name of the site, the dates it was recorded and who did the work.
While the site plan was being but together you are likely to have recorded information that will help identify the ship. Technology changed rapidly in the development of ships so some features on the site may help narrow down a range of dates for the ship and help put a name to the wreck. The presence or absence of features may also help, for example if you find an engine and boilers on the site is a clue that this is a steamship. Some of the features to record that are useful for dating are listed above in the section on sketching. Finding something inscribed with the name or owner of the ship is rare but not unknown, more often you will find something that is stamped with a date or a manufacturers name such as a coin or a bottle.
Do Some Research
_s.jpg)
From the sketch you made a site plan and from this you have some clues about the name of the ship or what type of ship it was. It is likely that there is a list of known shipwrecks for your part of the world that has been published by a historian or wreck enthusiast. To match a name with your wreck site you need to narrow down the options available by eliminating as many from the list as possible, and hopefully there will be only a few possible candidates left on the list. The details you recorded about the ship may set a range of possible dates for the ship, you may be able to estimate its length, identify the cargo or match the number and type of guns on board. Here some experience is required in sifting through the evidence; ships are modified, engines are salvaged, anchors and guns get re-used, so calling in some outside help may speed up the process.
If you narrow the options down to one or two ships you can follow this up by finding out more about their history. This part of the project can become the favourite pastime of some members of the team as its just exploration of a different kind. Finding a newspaper account about the loss of the ship or reading the actual ships log is very rewarding, often providing more clues leading to more discoveries.
Publish the Results
The shipwreck project may have been done for fun or for interest but I can guarantee that somewhere there will be someone very interested in what you found out. The people interested in your work may want to help on the next project, they may be able to provide skills to take your project further or they may be able to tell you much more about the ship than you already knew.
To find them it is important to tell people about what you have done and as widely as possible. Setting up a web site or facebook page about the project will reach a wide audience and can be done while the work is progressing allowing people to offer help or advice. The Nautical Archaeology Society are keen to have reports submitted to their quarterly newsletter, these do not have to be of academic quality and are of most use to the readers if you describe what work you have done and how you did it. Talks given to local dive clubs and historical societies are a great way to get support for the project and also give you an opportunity to meet local people who may know about your ship. Local TV and newspapers can be useful for promoting the project locally.
Notes
Help and Advice

This short note could only give an overview of a typical wreck recording project so its likely that you will need some outside advice at some point. There may already be an organisation working on wrecks in your area who could provide advice, such as the SHIPS Project team in Plymouth. The Nautical Archaeology Society will be able to help and may know some experts in your area. Local museums and archaeology societies may also be able to recommend some good contacts.
Training
The Nautical Archaeology Society provides training in the sketching, surveying and recording work that you will do underwater so it is worth doing their courses. Starting with the one day Introduction course you learn about some of the basic survey and recording methods and get an opportunity to try them out. The two day Part 1 course leads on from this and at the end you will have completed an assessment survey of a wreck site on the shore or underwater. Advanced Part III courses can be taken in many skills including photography, research, underwater surveying and running projects. Check the NAS web site for dates of the next courses nearest you.
Responsibilities
There are some other issues and responsibilities to be considered when organising a wreck recording project. The first is that safe diving practice is used whenever working on a wreck site. The second consideration is what is best for the site, if the site you have found is a recent discovery and could be old then it is likely to be important so it needs to be treated with care. If you find a site that could be very old then it is advisable to get some help and advice as soon as possible.
If the wreck is old or unusual, please get advice
You also have a responsibility to look after whatever you recover from the site. Things recovered from the sea will tend to fall apart, especially if left to dry out, so the simplest advice is to only recover finds under guidance from an expert. Most objects will need some form of conservation and that is often expensive, so please think twice before raising anything.
You have a legal obligation to report any finds recovered from the site to the Receiver of Wreck. Wreck material recovered from within or brought within UK territorial waters must be reported to the Receiver of Wreck as required in the Merchant Shipping Act, 1995. Reporting wreck is simple process and involves completing a Report of Wreck and Salvage form which can be downloaded from the web. For more information please see the web site.
NOTE: All aircraft that have crashed in military service are protected by law and should not be disturbed without a license
Useful books:
Underwater Archaeology - The NAS Guide to Principles and Practice, 2nd Ed., ed. Amanda Bowens, 2009, ISBN 978 1 4051 7592 0
Underwater Finds - Guidance for Divers, Joint Nautical Archaeology Policy Committee
The Wreck Diver’s Guide to Sailing Ship Artifacts of the 19th Century, David Stone, 1993, ISBN 0 9695010 1 3
First Aid for Underwater Finds, Wendy Robinson, 1998, ISBN 1 873132 66 2
Basic Equipment List
Name |
Description |
Buy |
Tape measures |
Fibreglass, 30m long in an open frame |
B&Q |
Drawing slates |
Plastic, A4 or A5 size |
NAS |
Pencils |
Plastic, Papermate Sharpwriter or similar, BIC Evolution |
Staples |
Folding rule |
Plastic, Hultafors or similar |
NAS |
Flagging tape |
Yellow, for marking features |
York Survey |
DiskMark tags |
Yellow, for labels |
York Survey |
Cable ties |
For attaching tags and marking points |
B&Q |
Line reel |
50m, marked up in 10m intervals with a permanent marker pen |
Dive shop |
Compass |
Magnetic diver’s compass |
Dive shop |
Dive computer |
For measuring depth on site |
Dive shop |
Marker buoy |
Fixed or delayed surface marker buoy, for positioning the site |
|
Scale bar |
1m or 500mm long, made from 10mm aluminium or copper tube |
B&Q |
GPS |
WAAS enabled, Garmin 76C or similar |
Online |
Download
![]() Download a PDF version of this document
Download a PDF version of this document
![]() If you have any more information about this then please contact us.
If you have any more information about this then please contact us.